Building a Skjelter

North House is bustling with the excitement of summer. Campus has been packed with classes and students from all over. This past month we hosted a guest instructor from Norway by the name of Trond Oalann. He visited us 2 years ago to teach a class about building a stavlinebygg, one of the many timber frame varieties found in Norway, so it was a thrill to have Trond back with his sense of humor and traditional carpentry expertise. Another fantastic and unanticipated pleasure of this class was that many of the students from Trond’s stavlinebygg class two years ago came for the skjelter class. Students inevitably form their own little class community but I have found that with these longer format courses students get to know each other well. To see so many familiar faces in this class was a treat. In the tradition of our last class there were many long work days followed by harborside grilling and music by the fire. What’s not to love?

mike-loeffler-july-1.jpg
mike-loeffler-july-2.jpg
mike-loeffler-july-3.jpg
mike-loeffler-july-4.jpg

This class was organized around a structure called a skjelter. The name is pronounced “shelter” and refers to the removable vertical wall boards that define the structure. This building is part scribed log construction and part timber frame construction which offered us a lot of opportunities to learn new techniques. Skjelter buildings were used for unheated storage. Trond explained that they were most commonly used for hay. Since Norway is such a mountainous country agricultural land is precious. With that in mind farmers often salvaged any amount of hay that they could possibly get their hands on. Skjelter buildings were constructed on the fringes of the farm so this hay could be stored where it was cut, avoiding the labor intensive task of transporting hay from hard to reach places on the farm. These structure became far less common after fertilizers were introduced. They were also commonly used for cheese storage and boat houses.

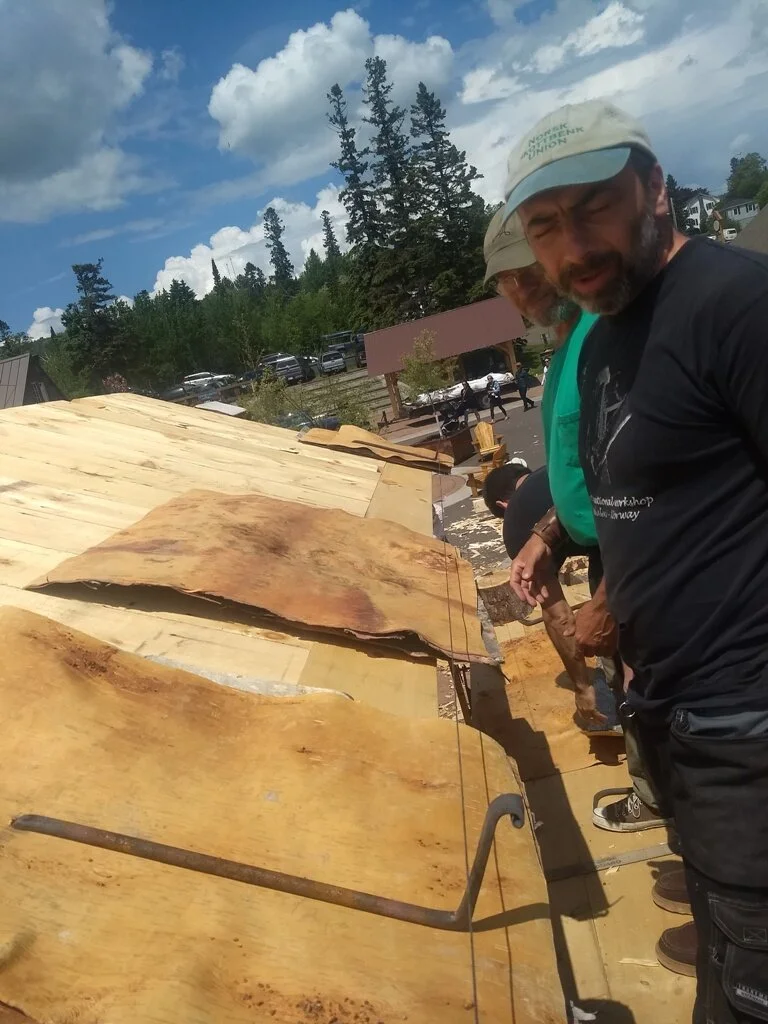
The neat feature of this building are the removable wall boards. There is a horizontal component that contains a lateral groove corresponding with a groove on the underside of the wallplates. This piece is tapered, allowing wall boards to be inserted at the widest opening and slid into place. This wall system gives some protection from driving rain but allows one to open up the building to allow air circulation.

We relied on hand tools for most of the work on this project. All the components were hewn with axes. The wall boards were made from small diameter black spruce that we sawed in half using a pit saw. There were many sun-kissed faces, blisters, and somehow, smiles.


The building has two courses of scribed logs as a “sill” and two courses of logs that serve as wall plates. These scribed log courses are all laid out first then the gable wall logs and the roof system is created. This sequence allowed us to work at a comfortable height while scribing and fitting the top courses of logs and the roof system.

mike-loeffler-july-5.jpg


After all these pieces were dry fit we took apart the assembly and fit  posts into the 4 corners of the structure. Once these fit nicely the upper log courses and roof assembly were put back together. Ceiling boards and interior floor boards were scrub planned and installed. After 10 days of hard work we all took a break for the wooden boat show.

mike-loeffler-july-6.jpg
mike-loeffler-july-7.jpg
mike-loeffler-july-8.jpg
mike-loeffler-july-9.jpg
mike-loeffler-july-10.jpg
mike-loeffler-july-11.jpg
mike-loeffler-july-12.jpg


Immediately following the Wooden boat show Trond led a three-day workshop to finish off the skjelter with a traditional birch bark and sod roof. Birch bark  is amazing material. It is waterproof and rot resistant. In this roof system the layered birch bark creates the waterproof drainage plane. Under the UV light protection provided by the 5” thick slabs of turf this bark will likely last 70-120 years. Not bad. Some of the exposed edges along the eaves and gable ends may need a bit of repair work before then, but it’s a durable and beautiful roof.

mike-loeffler-july-13.jpg
mike-loeffler-july-14.jpg
mike-loeffler-july-15.jpg
mike-loeffler-july-16.jpg


Last year Peter Henrikson and I along with a number of kind and willing volunteers harvested 600 pounds of birch bark for this project. The volume of bark required for this little roof was quite surprising. There’s about 7 layers of bark in any given spot on the roof.

mike-loeffler-july-17.jpg

The bark is laid directly on to the roof boards and interwoven and layered in such a way that there are no upturned seams. Iron brackets were forged to support a hewn log that runs along the eave and serves as a retention wall for the sod. The sod weighs down the bark and protects it from the elements. Finally a half lapped pair of timbers straddles the ridge pinning down the bark and retaining the sod. These timbers are held in place with large stones that are notched and held down by a long clinched nail.

mike-loeffler-july-18.jpg
mike-loeffler-july-19.jpg
mike-loeffler-july-20.jpg
mike-loeffler-july-21.jpg
mike-loeffler-july-22.jpeg

It was a great project with a fun crew and a great instructor. This little building looks right at home sitting on the harbor!


It you want to follow more of Trond’s work check out his instagram feed @oalannt.

Chair Exploration

I’m continuing on my exploration of chairs this winter and, I must say, it’s been a fun challenge. There’s been some successes, failures, and lots of opportunities to learn. I have a number of great books on the topic that are invaluable in this prototyping process.

1.jpg

I started the second chair design by creating a scaled wooden seat blank and added thick gauge wire pieces as stand ins for the legs. This is a little design tip from Drew Langsner’s book “The Chairmaker’s Workshop.” What’s great about this method is that you can easily manipulate the rake and splay (angles of the legs from side to side as well as front to back) easily to asses the aesthetics before committing precious materials to a full sized prototype.

2.jpg

The first windsor style chair project in the “Chairmaker’s Notebook” is a welsh stick windsor. These chairs are lovely and have less exacting specifications than some of the other windsor traditions. They’re folk chairs, each one slightly different. They are less refined and match my goals and aesthetics. I referenced this chair design as I was making drawings and thinking through the process.

3.jpg

The low-back style I settled on has a pieced together back bow. This particular component of the chair is often made from a naturally curved piece of wood or perhaps a steam bent section. Another common way to create this curved piece is by gluing up multiple straight grained pieces.

5.jpg
6.jpg


I chose the later because it worked well for my set-up and the materials I had in the shop. The mortises in the seat that accept the spindles (vertical sticks that connect the back bow to the seat) are created by drilling through the back bow aligning the holes by sight. This can be surprisingly accurate and there is something very satisfying about trusting your eye.


7.jpg
8.jpg

BUT as a person with limited experience with this technique my alignment was less than perfect which created a lot of tension in the back bow during assembly. Right when I got to the final few taps, as I was driving the spindles into their mortises my back bow exploded in dramatic fashion, splitting along some of the short grain in my glued up piece. It’s humbling to destroy a piece that you’ve spent a week on, but the seat assembly was still salvageable so I went back to the drawing board.

9.jpg
11.jpg


With that excitement under my belt I redesigned the back bow to give it more strength near the spindle mortise where the tension was greatest. After careful redesign and consideration I went to assemble the chair and blew up my second bow piece. I could tell I was closer but the amount of tension caused by my inaccurate drilling as well as the materials I used for the back bow made for a second failure. This struggle has been super informative and though it’s never fun to make those critical mistakes I know way more about this process now than when I started. Luckily the damage on the second back bow was not severe and I was able to repair it.

I have been looking through a number of books on various European wooden folk arts and came across these fascinating textile tools from Finland with beautiful human skull motifs.They have a lot of similarities to day of the dead symbols and carvings from Mexico.

The objects are referred to as Rullstol which translates to wheelchair in Finnish. After asking around it seems that these objects are used to make skeins of yarn from spun fibers. Every example I came across included a flower of life pattern located in the center of the forehead of the skull. If you know anything about this tradition shoot me an email. I have been digging around but haven’t found a lot of information about these objects.

Being drawn to these human skull designs I felt compelled to add one to my stick chair project to give it some folk art flair. Who doesn’t want to sit in a the lap of a wooden skeleton? I made a drawing of the design I was after and then carved a sample to work out any kinks.

IMG_20190312_113607746_HDR.jpg

It turned out nice but now I need to paint the chair and painting is whole different challenge. I’ve carved many items that take a turn for the worse when I break out the paints. This might be a discussion for another time; the trials and tribulations of color selection. To finalize this project I’ll be putting together some color samples and using my carved test skull to help make some finishing choices. I’ll be posting pictures of this process on my Instagram account so stay tuned if you’d like to see more.


Have a Seat - Part 2


I acquired some black ash logs over the course of this past spring. During the summer months there are abundant opportunities to demonstrate craft skills around North House. I mentioned in the past post, people are amazed when they see a person splitting down a log, cleaving it into billets, and making parts with a shaving horse and draw knife. There’s a wonderful sense of amazement when a person unfamiliar with the process sees what amazing results one can get with such simple tools. That said, it’s one of my go-to demonstration projects and I built up up a nice little pile of riven black ash chair parts for future projects.


I’ve built quite a few windsor stools in the past but hadn’t had the chance to take the next leap and experiment with chairs. Though I understood the basic skills involved I wanted some reinforcement with a nice beginning project. I purchased a copy of The Anarchist Design Book by Christopher Schwarz and studied his staked chair chapter. The book encourages people to build rather than buy quality furniture by introducing a progressive series of related furniture projects. Not only is it filled with easy to understand instructions but it’s an entertaining read as well. You can get a copy for yourself at the North House school store or directly through Lost Art Press. I used his method and basic geometry to help design my chair and guide the process.

Chairs are satisfying to make and require many different skills. They’re exciting little architecture projects. A person gets to shape an attractive and form fitting seat through the reductive process of carving and build a structure of body supporting components all in the same project. Unlike cabinetry there’s no straight lines to speak of. It’s an intriguing web of connected geometry and it is easy to geek out. The more time I spend making plans and drawings for the next prototypes the more interested I become in the subject. The main catalyst for my dive into woodworking, and greenwood working specifically, was spoon carving. The draw of these objects is the subtle design challenge in each spoon. To function well a spoon needs to have certain attributes but within the confines of those attributes one can create an infinite array of variation. Chairs are similar. It’s main function is to support the human body and in order to do so there are certain parameters. Within those parameters there is ample room for creativity and those margins are where I’d like to explore as I gain more experience.


This won’t be a how to on chair making but I’ll list out the steps here and share few accompanying photographs of the process to give you a taste.

  • Split and process material for legs and spindles: They need to be as dry as possible when the chair is assembled otherwise the components may shrink resulting in failed joinery.

mike-loeffler-january-3.jpg
  • Glue up material for seat blank.

  • Laying out seat profile, spindle and leg locations along with sight lines: The sight lines allow you to line up your drill bit in order to create the compound angle that determines the rake and splay.

mike-loeffler-january-6.jpg
  • Drilling angled mortises for the legs and spindles.

mike-loeffler-january-8.jpg
mike-loeffler-january-9.jpg
  • Taper leg mortises in the seat using a reamer: The tenons of the legs are tapered and the mortises in the seat are reamerd to match which helps the joint stay tight with the continual downward force of a sitting human body.

  • Carve seat: This is often referred to as saddling. A seat that is shaped like a human hinder is amazingly comfortable compared to a flat plank.

mike-loeffler-january-10.jpg
  • Install undercarriage: This refers to the legs. In many cases the legs are also supported by stretchers which connect the legs to each other horizontally holding the legs in place. It’s great bonus support but not always necessary.

  • Cut out and shape comb, drill mortises: The comb is the support piece that cradles your back.

mike-loeffler-january-13.jpg
mike-loeffler-january-14.jpg
  • Turn tenons on the spindles: These need to be tight as they will take repeated punishment as you lay back in your chair.

  • Join spindles and comb.

mike-loeffler-january-16.jpg
  • Join comb assembly with seat.

mike-loeffler-january-15.jpg
  • Paint and finishes: I used milk paint to finish off the chair. There’s a base coat of orange with a finish coat of a light sea foam green. After running some fine grit sandpaper over the final painted surface the orange base coat shows through highlighting the texture of the carved surface.

  • As a first run I’m quite pleased, but I did learn a few important lessons. The spindles should be tight but not too tight. I had some issues during assembly as I tried to join the spindles with the comb. There was a little bit of cracking in the seat and it was difficult to get the spindles fully seated in their mortises.

  • I’m working on the next design and will report on that in an upcoming post.

Have a Seat - Part 1

I’ve always loved sitting at a shaving horse with a drawknife making shavings. I’m not at all surprised that almost everyone I introduce to the shaving horse/draw knife power duo feels the same love. There’s something to it. As a North House  intern in 2011, I was able to spend time with John Beltman learning about windsor stools. Since that time I’ve fooled around with a number of other stool projects.


They’re fun because of their simplicity and their flexibility. You just need three legs and a place to set your buns and you have a comfortable perch. Lately, I’ve been reflecting on why seating continues to intrigue me.

My personal creativity seems to thrive with constraint. One of the beautiful things about craft and making functional objects is that to remain functional an object can’t stray too far from its relationship to the human body. There are limits. Though a person can make 500 unique chairs in a lifetime, a chair’s usefulness and comfort are tied to the human body and the human environment. Those are the parameters that tickle my fancy.

We, as a species, are always changing but we come in a fairly set range of sizes. I came across a fascinating book on design titled “Human Dimension and Interior Space,” by Julius Panero and Martin Zelnik.

ml3-8-2.jpg
ml4-8-2.jpg

The book lays out interior spaces and the items within as they relate to the human body. It’s a great resource for thinking about our relationship to the space we inhabit.

Influenced by the book and my curiosity with simple furniture I participated in a class through the Grand Marais Art Colony , “Sculpt a Chair,” hosted by sculptor Greg Mueller  at his studio in Lutsen. The class was a broad ranging introduction to various metal fabrication techniques. What a great opportunity to explore!

Chairs are ubiquitous. Some are comfortable, others not. Some are beautiful, others not. How exactly do you make a chair that fits your body and is beautiful to the eye? Good question, and, even better, a good challenge.

I consider myself a woodworker. I love trees and I love wood. Metal is a whole different animal. I approached metal work similar to the way I approach wood work, but to my delight I was able to make dramatic corrections in the middle of my experimental chair project.

ml5-8-2.jpg


Cutting a piece of wood is a fairly final commitment. With metal you can cut a piece, assess, lop of a chunk here, weld a chunk there and make adjustments in the moment. 

ml6-8-2.jpg

I’m sure there are metal workers that may see this and question my approach but it was certainly a thrill to get a taste of different skills, methods, and possibilities.

As I dug around in the scrap metal pile at Greg’s studio I happened upon a broken ikea futon.

I wanted to create a piece that incorporated wood and metal so I was able to salvage some bed slats and turn them into chair slats.

ml10-8-2.jpg

 It was a fantastic experiment to play with metal, but my heart is still clad in wood. That said, wooden chair projects are in my future. In my research I’ve found mesmerizing folk chairs from Scandinavia in the digital archives .


What I find so inspiring about them is that none of them are the same. These chairs were made with hand tools and whatever materials were available. These weren’t made for sale. Instead, these were for use in the home. 500 makers = 500 different chairs. That’s beautiful to me.


Stay tuned for Have a Seat. Part II coming….someday in the not so distant future.

Bird Bowl Bonanza

mike-1.jpg

I want to take this opportunity to tell you all about a project I've been working on.  I recently received an Artist Initiative grant through the Minnesota State Arts Board to fund the creation of a series of bird bowls. The prompt for this particular grant program is to identify where you are in your career, identify where you'd like to be heading, and propose a project that will help you take that step. I have been carving bird shaped bowls for the last 3 or 4 years and though they are well received they were production items that I needed to make as quickly as possible in order to sell them at price that seemed to fit the market.  The goal of this project is to slow things down in order to make some more detailed work and to take more risks.

mike-2.jpg

As a part of this intentional slowing down, I've been doing some relief carving test boards to develop patterns, color studies to create color palettes for the new bowls, and more involved drawings on the front end to work out ideas.


mike-3.jpg

Exploring this craft in more detail is exciting. There is a critical moment in making these bowls when the form is complete, the detail carving is finished, and it's time to paint.  This is where it can all spiral out of control. In the past, after reaching this point I would be thinking about the next project and hastily paint. Unfortunately, I've had a few emotional moments when after spending the time creating a nice form and thoughtfully detailing it, I throw on the paint and essentially ruin the piece by being somewhat thoughtless about that final step. To try and resolve that problem I'm making a large stash of painted tiles that can be sorted into groups and laid out with the piece before hand. Hopefully this new process will help me to avoid those disappointing moments of paint regret. In this process I wanted to develop some modified shop furniture and clamping devices to make working on these oddly shaped bowls a little easier.


mike-4.jpg


The picture above is of a modified bowl horse that  makes the initial roughing out phase much more ergonomic. This design is a mash-up of shaving-horse- type designs from talented crafts people: David Fisher, Tim Manney, and Dawson Moore. In the photo you can see this bowl horse is a bench that a person can sit on. By applying pressure on the swing arm the arm acts like a lever pushing and securing the piece against a notched wooden block close to the seat. Holding a bowl in this way allows me to free up both hands and utilize a draw knife to do some rough shaping.

Another piece of this puzzle is figuring out a good way to hold the pieces while doing the detail carving. At the point of detail carving, the bowls are already shaped so you have to be gentle as well as giving yourself clear access to large portion of the bowl's surface. I started modifying some clamps to suit my needs. Being excited about clamps is pretty nerdy so be forewarned that this is for the clamping enthusiasts out there. And I know you're out there.


Exhibit A: This is an F-clamp with a turned wooden extension that is capped with a leather puck to prevent marring the inside of the bowl. The clamped bowl can then be put in a vice so I can carve on the surface.

mike-5.jpg
mike-6.jpg


Exhibit B: This is a wooden clamp that has an expansion chuck with leather lined jaws. What does that mean? Essentially there is wooden half circle that can be expanded inside of a bowl in order to secure it. The toggles for these types of clamps are available so that a person could make the wooden components in a way that suits their needs. This is a prototype, but its certainly working well so far.

mike-7.jpg
mike-8.jpg


If you are curious to see more check out my Instagram account: @m.j.loeffler  .I will be posting the series of bird bowls as they develop.